!!! This is a SiteProxy proxied website, do not enter your personal information. Refer to: https://github.com/netptop/siteproxy for details !!!×
Showing posts with label tape. Show all posts

Saturday, March 29, 2014

Grid Art, Patterns & #tmwyk

Math related conversations with my 8 year old tend to pop up unexpectedly. These are often around something she's making, and are often a gorgeous little gem of a surprise. Today was no different.

I found her creating a grid of tape on top of a piece of origami paper. She was coloring it in when she said, "You know, mama, patterns don't necessarily have to be colors in order."

Oh my gosh!

Me: What do you mean by that?

As you can see from the picture, below, she was coloring the whole page somewhat randomly, sometimes following the columns down, sometimes not. 


Her: Well, the colors don't have to be regular, they just need to be in the windows."

Me: You mean the windows are the places where the tape is not covering the paper, that's what you're looking at? It doesn't matter what color windows are, just that they're colored in?

Her: Yeah.

So here I pause to do a happy dance. My biggest discontent around patterns is that many kids grow into adults who think that "patterns" are only linear repetitions of colors. It is clear she has not internalized that particular reality.  The other reason I'm happy is that Prof. Triangleman once said to me:
"Math is when you say exactly what it is you want to pay attention to, focus only on that attribute and ignore everything else."
She was doing this!  Her pattern has 'windows' that are colored in, but the pattern is not defined by the colors themselves. She was consciously creating a pattern of windows (spaces between!) and consciously excluding the colors. I am thrilled to have caught a glimpse of this multi-layered attention in action.

This really goes to show you that it's worthwhile to keep your ears open while kid is focused on making or building something.  Even if it's after the fact, ask your kids to tell you about what they did, even if it doesn't look like much.  I mean, just look at the taped/colored piece again. It's pretty much a bunch of scribbles and it'd be super easy to pass it over, to think it was nothing special. In reality, though, there was so much thinking going on while she worked.

Here's what the piece looked like when she took the tape off:

 
Her: Oh.

Me: You seem surprised. Did that not turn out the way you expected?

Her: Why do you sound like a journalist?

Wednesday, October 30, 2013

Happy Twittereen: The Power of Tape, Example No. 10,233

It's #twittereen over on Twitter.  The last few days I've been completely confused by people's profile pictures/avatars as they 'dress up' as someone else.  I was pretty sure I would just let this one roll right by -- I don't usually move or think fast enough for social hyjinks -- but then I saw this. I wasn't sure what it was, at first -- I know my taping anywhere, and this looked suspiciously less professional different:


Turns out, Christopher (@trianglemancsd) dressed up like me!! This is the picture that I use on Twitter (notice the precision tape job ;-).  Fun stuff!


Later, it became clear those are his kids jumping in the photo he took! And, an even better surprise was that completely without prompting, his action of putting tape on the floor turned into a story that confirms everything I know about tape on the floor. He wrote:
I laid down some tape on the kitchen floor for the photo last night, then proceeded to do the dishes. Tabitha [who is six] wandered in and proclaimed "There's tape on the floor!" She then spent the next 20 minutes making up games using the tape lines. There was one where you needed to jump from one tape line to the next, always landing on one foot, with an extra challenge of landing as close as possible to the end of the line. There was another where you stand in one square, put your hands in the other then jump your feet over to the one where your hands are, with extra credit for doing it with style.
She was eager for me to finish the dishes so that she could teach me the games, which she did and we spent another lovely 15 minutes on that before I had to cut off for the photo and then bedtime.
It was a beautiful little family moment.
See?! This is what I have been saying for years! Put down some tape, even just one straight line, then wait and watch. Changing the environment, even slightly, will invoke an explore response in kids and, inevitably they will find some way to figure out this 'new' space with their bodies. (And, it's a body thing, but for kids it's also a body knowledge math thing.) Fantastic.

Christopher also mentioned:
Also, I have a square on the floor of my office (more carefully taped, I'll have you know) that I laid down when I was practicing for my #miyfeet lesson. People notice it and comment on it when they come in. But NO ONE plays with it. Common questions from my colleagues include whether it is where they need to stand while they talk to me, or where I put students who don't do homework. Students tend not to comment on it. Tabitha hasn't been in my office since I laid it down, but I predict great fun will be had when arrives someday.
No, it's a KID THING. That's why adults (even teachers unfortunately) don't get it right away and why I am always in need of more proof/examples of the power of tape to inspire movement and explorations of space, especially in younger math settings. Harvard professor Eleanor Duckworth, in her book of essays The Having of Wonderful Ideasspeaks to my reasoning around tape:
"In my view, there are two aspects to teaching. The first is to put students into contact with phenomena [of which tape on the floor is a good example] related to the area to be studied -- the real thing, not books or lectures about it -- and to help them notice what is interesting; to engage them so they will continue to think and wonder about it.  The second is to have the students try to explain the sense they are making and, instead of explaining things to students, to try to understand their sense." 
Children can 'explain' their sense making through their bodies if you have the right glasses on. Just before my dance workshop in St. Louis last week I noticed kids out in the lobby playing (jumping around) on an inset in the tile floor - darker tiles that made up an array and a specific space within the larger floor area. These were not just kids getting out some energy (although that was part of the story) but kids having their own new, wonderful ideas about how to explore the new and interesting floor patterns. Kids will play in new ways (to them) and in new physical environments with their bodies first. That's the truth. 

Sunday, June 2, 2013

Introducing the Tape Chronicles Project

It's really no secret I love tape. I should have bought stock in it long ago.  In my mind, tape is the ultimate open-ended, the world is your oyster, creative, hands-on learning and making supply.  I mean, just look at how versatile it is:

You can change an environment in an instant!  Need kids to be able to visualize diagonals while creating foot-based percussive patterns? Voila!


Are you six and want to visualize a trajectory to the moon?  Tape's for you!


Even clear packing tape can be harnessed in the pursuit of art making and invention:


Check out the endless ways tape can be employed in the interest of math, art, kinesthetic exploration, invention and education -- and then consider submitting some examples of your own!  The Tape Chronicles are housed over at the Math in Your Feet website.  Hope to hear from you!

Sunday, July 15, 2012

Floor Tape, How Do I Love Thee? (Video Edition)

I'm in the middle of summer programming.  It's Math in Your Feet in a lot of ways but also not completely like the program I do in schools.  It's more like a whirlwind of percussive choreography, rhythm, and patterns of all kinds. There's also a lot of math in there as well, just not explicitly. 

My reasoning for this that kids need as much exposure as possible to patterns in multiple, diverse contexts.  These kids I've been working with, for example, are a perfect case in point.  When asked on the first day to find patterns in the room in which we were working, they were at a loss.  In all the groups, color patterns were found first.  Then somebody would notice a sequence of objects, but it didn't repeat.  A potential pattern unit, but not a pattern in itself.  Even the three examples of simple tilings in the room (floor, ceiling and walls) escaped notice, even when I pointed them out. 

Patterns are more than sequences of colors.  They are more than two dimensional shapes.  They are sounds, movements, expressions, order. They are long and short.  They repeat.  They change.  They're everywhere. So, when I say we're not talking about math explicitly I mean we don't need to talk about it because we're doing it.  Calling it 'math' interrupts the flow we've created -- sometimes just doing and experiencing is enough.  This doing time is a chance to get swept up in the creating, to be fully engaged and amazed and delighted in your own abilities.  I believe this because, simply put, that is what I find best about learning something new.

On top of the sheer fun of watching kids engage in new pursuits like percussive dance, one of the reasons I'm enjoying doing the summer version of Math in Your Feet is that I have leeway to experiment with how I deliver the program, engage my young dancers (right now ages eight to eleven) and how I set up the space.

In the videos, below, you can see what I'm trying out right now.  This big grid isn't the normal setup for Math in Your Feet but I was really excited to tape out the space this way.  Normally, when kids start making up their own dance patterns they usually get their own personal square dance spaces taped out in individual groups of two, each pair slightly separated from the other groups. I'll be very interested in how the new set up works out (or doesn't). 

This new set up came about because the floor really lent itself to a large grid format. The girls in the room were hanging out with me before class while I set up and helped me tape out the floor.  Any time I have a chance to let kids help me tape, from preschool to upper elementary, my helpers invariably end up spontaneously exploring their newly taped environment without any prompting.  This is actually my favorite time with kids -- manipulating the floor space with tape and then seeing what they do when they first discover it.  Here's a peek at the space and the only part of their exploration I could capture on video:


Their movement is a natural kid reaction to squares -- Hop Scotch!  But in this second little clip you can see how they started exploring rows as well as columns.


Later, during our class time, when we were talking again about other kinds of patterns they could find, other than the ones we were making with our hands and feet, they noticed that each square of the large blue grid was made up of four smaller tile squares.  Given that on the first day they never even noticed how the floor was designed when I asked them about patterns in the room (before I put down this grid), this was a huge step forward at identifying and describing the structure of their environment.

Speaking of patterns, I've also been sneaking in some Fibonacci numbers as well.   But that's for a future post...  In the mean time, here's my original love note about floor tape and its myriad uses.  And, one of my favorite posts in this blog about how the tape on the floor serves as the 'third teacher' in my Math in Your Feet residencies.

Saturday, May 12, 2012

Big Math: Kid Sized Geometric Structures

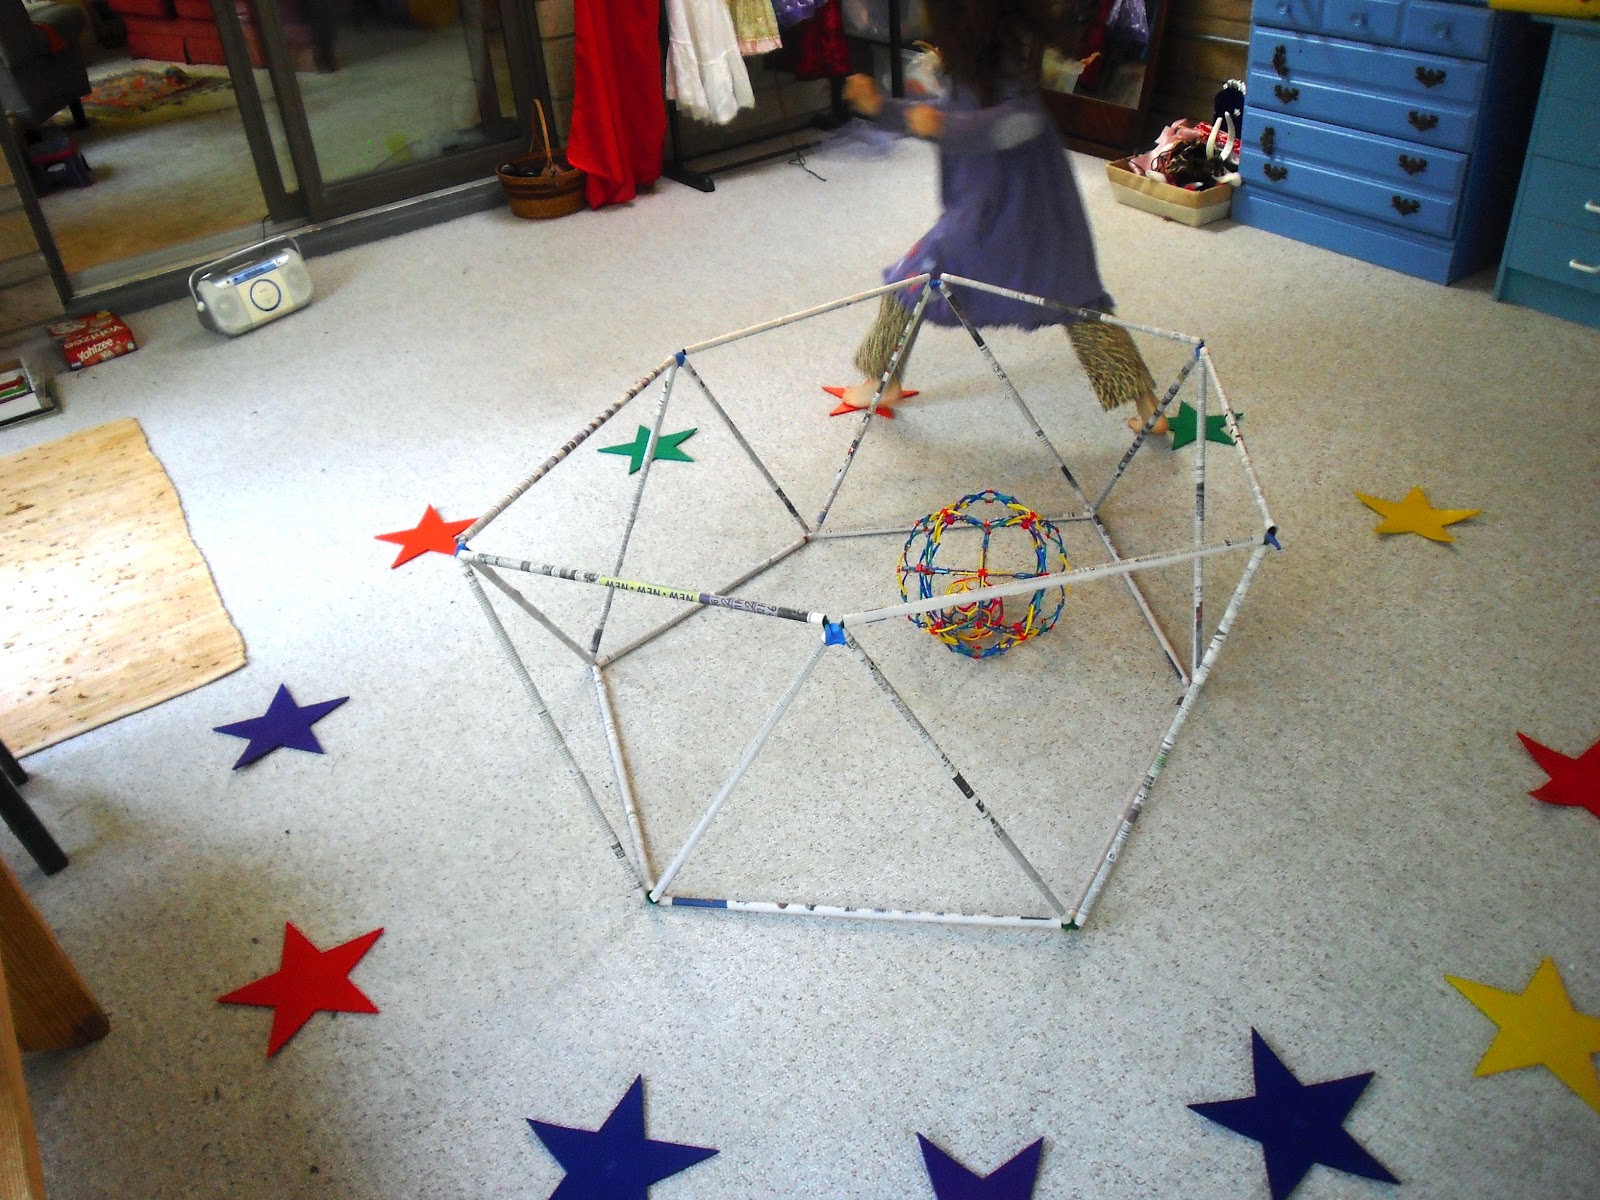
Oh my gosh, look what we built!   This was not a small moment of math, no indeed.  This was a BIG math moment, one that took nearly all day (mostly because we had to figure it out for ourselves from start to finish).  And, it cost next to nothing and yet we gained so much.  In these next two pictures it's only about a third of the way done, but isn't it wonderful? 

You can run around the outside of it, of course...

Or you can hang out inside it but, at this point, it's still not all that stable and there's a LOT more building to do.  But I'm getting ahead of myself -- here's how it all started...

Having just finished the entire Hunger Games series in one week I was left with nothing to read while the kid fell asleep except this.  It's a catalog that came in the mail and I was flipping through it when there it was!  Some kind of structure involving tubes of newspaper, making some kind of geometric form...hey, I could make that!  What's this?  $40.00 for some connectors?  I don't need those connectors -- I'll figure out some other way!

That evening I figured out how to make those paper tubes and found out it's much easier and faster if you roll a section of newspaper around a dowel rod.  After it's rolled I tape down the long edge to the roll with clear tape and then slide the dowel out. 

After making four or five of them I left it there for the night.  As I often do, I left the tubes lying around to be 'discovered'.  It didn't take long.  At about 8:30am the next morning the questions started coming in from the girl.  All I had to do was show her the catalog picture and we were ON!

So, we got started building.  I couldn't tell all that much from the catalog picture, but I figured it was at least a hexagonal base, and those triangles were reminiscent of the dodecahedron and icosahedron I made from straws and pipe cleaners this winter.  I figured this was pretty much the same process, just bigger.  This was our first big lesson -- the issue of scale.  Turns out, the bigger your structure is, the more effort it takes to make sure it doesn't fall down.

Anyhow, at least I had the tube figured out.  My rolling method leaves a pretty sturdy paper tube but it is somewhat time consuming to make a bunch and pretty much for the mama to do and the six year old to watch.  Luckily, my kid likes hanging around, soaking in the process, while making things like this are happening.  You can learn a lot by listening to your parents mutter to themselves!

But what to do for the connector?  Now that was the perfect opportunity to do some brainstorming with the kid.  After some experimentation we settled on a small amount of folded newspaper that made a nice connector, but only when two empty tubes meet.

For a connector that attaches to an empty tube on one end and an already-connected tube on the other, the kid and I finally figured out that a combination of paper and folded pipe cleaner would do the trick.  And it did, sort of. 


It turns out that the points where five tubes meet need much more reinforcement.  In that case, use lots and lots of tape.  But I'm getting ahead of myself.

After finishing the hexagonal base and the first level of triangles we needed a break and luckily it was time for lunch.  How did it get to be lunch time so fast?!  We left it there for an hour or two but eventually both of us felt compelled to return to the project.  During our break I took a minute to look at the catalog picture and description more closely and discovered the following:

It was $40 for connectors and 120 tubes around which to roll your newspaper...???  Why did they even mention newspaper in the first place?  With all those tubes, no wonder that structure in the catalog looked so sturdy! 

I was pretty much clueless as to how to proceed past the first level.  I experimented with adding triangles to make a second layer, but it didn't seem stable or look right.  I said to my girl, "Hey, I think we need to make a model so we can figure out what we're going to do next.  I'll need help with that."

We pulled out the straws, I cut up some pipe cleaners, she connected the straws to make triangles, folded angles and helped me build the model.  Turns out this was a very helpful process.  What we figured out was that the second row of triangles needed to be connected by shorter edges (half of a straw length) if it was to have any chance of being useful.

Isn't it pretty?  Not sure what to call it, but at this angle it has the look of an icosahedron about it.

We applied what we had learned  in the model making process to the big structure and...it was still really hard.  Completely unwieldy.  Things falling, sagging, coming apart.  If those connectors had been close by for purchase, I  might have caved in and bought the things.  Since this was not the case, I had no other choice but to persevere.  I noticed the connectors had started failing and so I brought in the big guns -- tape.  

It was actually an incredible lesson in physics.  When even one side of one triangle lost its connection to the structure, the whole thing would start to tumble.  The kid was in the center helping to hold everything up so that it wouldn't completely collapse.  I'll spare you the gory details but, short story, I was quite liberal with the tape and we did eventually get it to the point where it felt fairly sturdy.

At some point in the middle of this circus act I said to the child, "It's a good thing we're doing this ourselves.  If we had bought the connectors I don't think we would be learning as much as we are." 

I wanted to leave it there, but the girl wanted the pointy thing on top, so we persevered.  And, what do you know?  Finally, finally, the thing felt whole, strong, sound.  Plus, the girl can stand up inside it!


"Mama, look!  A pattern!!  Up triangle, down triangle, up triangle.  Rhombuses!  Big triangle, narrow triangle.  And, uh, what do you call it? [running over to get the Cuisenaire rods to make the shape] A trapezoid!"

We even called over to our next door neighbors so they could come and admire our accomplishment, which they did and which is precisely why we like them so much. 

"Mama," she said, "It's beautiful on the outside, but it's even more beautiful when you're inside it.  There's a flower up there."

Ah, the magic of math.  Structure, symmetry, order, strength, beauty.  Ours. 


[Linking to Saturday's Artist at Ordinary Life Magic.  :-]

Wednesday, August 10, 2011

Tape! On the Floor! At MoMA!

I know it's sorta' old news but I love this!  I've been pretty public with my love for different ways to use tape to manipulate an environment and encourage physical exploration of that environment. 

Can you imagine what happens when a child enters this MoMA space?

How do you use floor tape in your teaching?  I bet the possibilities are endless.  Send me some pictures so we can all see and I'll post them here! 

Tuesday, November 30, 2010

Math & Movement Lesson: Basketball Court Pathways

Ooooh, I just had an idea!  Last year I developed a preschool math/movement program by creating simple pathways through an empty space with different colored tape on the floor, and adding locomotor movements down the different paths.  Within a couple months the kids could follow more complex pathways using combinations of locomotor movements.
 
Look at all those lines!
I've been thinking recently that what I did with four year olds could be adapted for the K-2 set.  The problem is that putting down tape can take a long time.  However...

Most public schools and sports centers have a gym.  A gym with lines already on the floor.  Basketball court kinds of lines.  Lines that are straight and curved.  (It's hard to make curved lines with tape. Really hard.)  To take advantage of all these lines and all the open space, here's an idea to use with five-to-eight year olds that I came up with that merges an exploration of space with locomotor movements. 

The lesson, below, is definitely in the 'map is not the territory' category.  I've had the idea, I've based it on previous experience, I've mapped it out for you to try, but we won't know how it works until someone tries it out.  That's one of the reasons I am sharing this lesson, because I probably won't have a chance in the near future to try it out with kids and it seems like such an exciting idea!

The lesson is more like a whole unit of activities and you'll need to decide how to break it up into manageable chunks.  Also, since repetition is the key to learning, I encourage you to repeat a lesson until it's clear that everyone understands it physically and cognitively.  In even smaller chunks it could also serve as a movement break when needed in the course of a learning day. 

Finally, this lesson starts out looking a lot like dance, and it will build dance skills.  As you build those skills, the more math you'll be able to explore.  If you try out any aspect of this lesson I'd really love to hear how it went and if you have any suggestions or questions.  And, I'd love to hear from you because I'll have questions for you, too!  Leave a comment here or e-mail me at: malke (dot) rosenfeld (at) earthlink (dot) net! 

Basketball Court Pathways
©2010 Malke Rosenfeld, http://www.mathinyourfeet.blogspot.com/ and http://www.mathinyourfeet.com/
Users of this lesson have permission to share it with others with proper acknowledgement, copyright notice, and website links (as above).  If you want to share this lesson with forums, educational groups, wiki sites, etc. please consider sending me a message to let me know where you put it.  You can e-mail me at:  malke (dot) rosenfeld (at) earthlink (dot) com

LESSON OVERVIEW:
After exploring a variety of paths around a basketball court by following the lines, 5 to 8 year olds will:
  • decide on a pathway that has a clear beginning, middle and end;
  • create a pathway that includes both straight and curved lines as well as directional interest and some repetition;
  • decide on two to three locomotor movements  (skip, hop, run, walk, slide, gallop, hop, leap, jump) to use while moving down the pathway and which part of the pathway gets what movement;
  • map out the pathway on paper, including color coding and notating when and where to do their movements.

LEARNING GOALS:
Children will:
  • Use intentional, meaningful movement to gain experience and competency with spatial relationships, a foundation for mathematics understanding; 
  • Make creative choices about the length, shape, direction and design of the pathway;
  • Express creative choices with appropriate math and dance terminology;
  • Bring their kinesthetic experience to the symbolic realm on the page by creating a simple map of their dance; and, 
  • When appropriate, integrate the concept of scale and coordinate systems when mapping the pathway. 

VOCABULARY:
Locomotor Movements: skip, hop, run, walk, slide, gallop, hop, leap, jump
Other Movements & Attributes: turn, smooth, sharp, slow, quick, big, small, long, short, high, low
Spatial/Directional Terms: left, right, on, around, curve, straight, forward, backward, corner, on, off, double, single, length (time and distance), intersecting lines


MOVEMENT ACTIVITIES:
  1. Start by playing follow-the-leader around the gym to introduce kids to the different combinations of straight and curved pathway choices.  Start by walking on the lines -- as long as you stay on a line you're playing the 'game' right.  Model the idea of a starting and ending ___location by saying "We'll start at this corner, where should we finish our path?" and "Now we have finished this path, where should we start the next one?"
  2. As you play this introductory game, start giving kids choices about which locomotor movements to use (skip, hop, run, walk, slide, gallop, hop, leap, jump).  You can stay in the lead or give kids turns taking the lead which will help keep the game fresh.  Spend as long as you like on this, and perhaps even repeat the activity a few times a week for a couple weeks.  You can vary this 'game' by giving different challenges such as:  'How slowly can we move this time?' or 'How smoothly can we move?' or 'When we turn a corner, let's make it a sharp turn!' or 'Let's make our movements big on the straight lines and small on the curved lines.'  Keep it playful!
  3. After you're sure they have the 'follow the lines' concept, put on some music (examples below) and let the kids experiment with the lines to find their own pathways.  At this point it should just be about the path, not the movements. The goal is that eventually every person should have their own unique pathway.  After they've experimented for a couple minutes, have them 'freeze' and reinforce this goal as well as the... 
  4. Rules of the Road: If they cross paths or eventually share part of a pathway with another child, challenge them to be 'good drivers' and share the road.  Also, remind them that they need: a starting point and an ending point, to use at least 1/4 of the gym, and to include repetition (for example, two trips around a circle, or double back down a line).
  5. Let them work for two minutes then gather them in a group and see who wants to share their work.  Ideally, pick a kid who looks like s/he already has a pathway and is able to repeat it.  Get a couple kids to show first then send everyone back out to finalize a pathway they can repeat the same way every time. 
  6. Make sure every kid gets to show his or her pathway before moving on.  Use this time to give feedback; you'll want to make evaluative comments like "The lines you've chosen are all straight lines.  I wonder what it would look like if you added a curved line to your path?" or anything else you've noticed about their work.  Because this is a creative activity, there is no completely wrong answer/path, just decisions to make.  So, try to pose questions that will help the child become conscious of the decisions s/he is making.  When everyone has shared their work, this may be a good time to stop the lesson for the day.  Or, it may be a good time to go directly to the Mapping Activities section and complete Activity #1.
  7. Once everyone has a pathway, take some time away from the paths to review basic locomotor movements by saying, "Who knows what a gallop looks like?  Who would like to show me what a gallop looks like?  That's right, one foot in front of the other!"  Have one child at a time illustrate the different locomotor movements, naming each one as you go.  This is essentially a mini-lesson focusing on locomotor movements where kids get a chance to practice their locomotor movement skills by follow one of the lines on the court instead of a more complicated pathway.  That's a good way to assess where their skills are at.  You can never do too much of this kind of cross-lateral movement, which is why this is good for a movement break as well as a dance/math lesson.
  8. By now, you should have decided on your own pathway too.  The next step is to add locomotor movements to the pathways, so model for them what you are going to do with your path.  The best bet is to have one choice of movement per line and then change to a different movement when the line changes (straight to curved, or after you turn a corner.)
  9. Some final reminders for the pathways: turn all corners sharply, and find smoother movements for moving on the curved lines, which will enhance the attributes of a curve. 

MAPPING ACTIVITIES:
  1. Have kids review their pathways.  Using black marker, pen or pencil, have them draw their pathway as best they can on a piece of unlined paper.
  2. Make a little key of the movements used while traveling the pathway.  Write the moves down (i.e. skip, run, hop) and assign a color to each move.
  3. Redraw the pathway on a second piece of paper, this time using the assigned colors to create each section of the pathway.  An alternative would be to color the existing black-lined map using the assigned colors.   
  4. If you think it would work (7 or 8 year olds) have the kids trade maps and see if they can recreate the other person's pathway.

EXTENDING THE ACTIVITY:
Remember, the movement itself is furthering spatial understanding and this experience (up through the mapping, above) may be enough for five to eight year olds.  However, if you think your kids are ready, here are some additional suggestions to further the exploration of math concepts:
  1. Have the kids assign a certain number of skips, hops, gallops, etc. to each section of their pathway.  Make sure it can be danced first, and then transfer to the page.
  2. Measure the space and the length of the lines and then create a scale drawing/map of the pathway.
  3. Using the measurements of the space (above), create a scaled-down version of the pathway using an x and y coordinate grid.  The intersection of x and y would be oriented to the center of the space your path runs through.
To further the movement/rhythm concepts (some of which turn out to be math related!) try these suggestions:
  1. Develop beat competency.  Using one of the music selections below, work on moving 'to the beat' while moving on the pathway.
  2. Basic phrasing.  Each line segment in the pathway will have a certain length which can accommodate a certain number of steps.  Kids can figure out how many hops they can do on the line before getting to the corner or the start of the curve and then mark that on their map.  Which brings up another point...
  3. How many small hops on the line?  How many if you do your hops bigger?  An issue of scale, I suppose.  Lots of experimentation and questions (from you and the kids) along with a 'let's try it' kind of attitude can bring out some amazing math connections that none of us know are there yet!  Let me know what you find out!

MUSIC SUGGESTIONS:
This music is essentially for background color during the creative work.  Dancing to the beat is a whole other ball of wax, so please just start out using the music as inspiration for the creative work time.  That being said, you can spend some parts of your dancing time just on locomotor movements, and that would be a good time to work on dancing to/with the beat.

Artist/Album/Song -- all on iTunes
Chiwoniso/Rebel Woman/Listen to the Breeze (Modern African)
Vishten/Live/Figeac (Traditional Canadian)
Solas/Sunny Spells/paddy taylor's (Traditional Irish)

Tuesday, November 9, 2010

Tape Chronicles: Math in the Morning

I am a big advocate of supplying children with lots of open ended material and then letting them do what they will.  In my work in schools I use tape and more tape and so there is a lot of extra painters' tape (the low tack kind) hanging around our house. 

We've been getting up kinda extra early since the time change and have had a lot of time on our hands before school.  This morning the kid decided to set up a 'cat store' and, in the process of setting it up, found another interesting use for tape. 

She decided to decorate her 'store' by pulling off long pieces of tape, making them into balls and placing them on the lamp, as shown above.  What intrigued me was the placement of the little tape balls -- it's visually/aesthetically appealing, and quite organized for a little girl whose stuff is usually all over the place. 

I'm tagging this post under "exploring space."

Monday, October 11, 2010

Teaching Below the Surface: Harnessing the Power of Tape!

In earlier posts I espoused my enthusiasm for using simple floor tape to manipulate an environment and encourage physical exploration of that environment.  It's a powerful tool for teaching below the surface, something that makes a bigger impact when you don't talk about it because it's just there.  The Reggio Emilia approach says that environment is the third teacher and I have found this to be true in my work.  How I set up a learning environment can have a large impact on the students, and I have pictures to prove it!

In my work with elementary students we have a group dancing time to warm up and learn clogging, a little each day until they have some mastery of basic steps by the end of the week.  The bulk of our class time, however, is spent with partners engaged in creative work.  This effort is done in what I call a 'personal dance space': a scaled down version of the portable square dance platform on which I teach and perform.  Mine is wood, theirs are tape.  Mine is brown, theirs are blue.  Mine is three dimensional, theirs is two dimensional. Mine is 3'x3' and theirs are 2'x2'.  Did I mention I love floor tape?

On the first day we work exclusively as a large group and the tape on the floor in our dance space is a simple three-sided rectangle.  The kids line up with their toes on the tape and face toward the center of the space.  This way everyone can see me and what my feet are doing.  By the second day of our work together I've managed to tape out about 15 pairs of blue dance spaces.  Inevitably, on that day the kids walk into the room and, knowing nothing about what is going to happen in our class later, they go directly to a box and sit down.  I have to redirect them to the large-group perimeter tape but there's something about having a space of one's own, and these boxes just pull them in.

We never talk about the set up of the room, but since we focus quite a bit on transformation and symmetry in this program I try my best to make sure that, if asked, I can draw an accurate line of symmetry down the middle of our dance space.  So, without further ado, here are some drawings done by fourth graders as part of a Thank You letter project their teacher had them complete at the end of the residency.  No one told them what to draw.

I'm obviously very welcoming!  This was drawn from memory, back in her regular classroom. 
Notice the basic symmetry of the space. 
This isn't exactly what the room looks like (not enough squares), but you can draw a perfect line of symmetry from top to bottom of this picture.
One of the other 'below the surface' learning tools in the program is that working with a friend and sharing ideas can lead to amazing results.  Not only are these two girls dancing together (and smiling), they're dancing in a space delineated by blue tape! 

Saturday, October 9, 2010

Floor Tape, How Do I Love Thee? Let Me Count the Ways (Preschool Edition)

A few years ago I went to the Indiana State House in Indianapolis to view "The Hundred Languages of Children," a travelling exhibit about the Reggio Emilia approach to early childhood education.  If you're not familiar with this approach it, among other things, considers the environment (of the classroom, and other spaces) as a 'third teacher'.

Of course, I was drawn to the part of the exhibit that focused on movement and dance as one of the "hundred languages" with which children express themselves.  There was a video that showed the children's first experiences with an old factory space-- a huge room empty except for two rows of large, white columns.  The children were running around and between the columns, peeking around them, and interacting with their friends, all movements and ideas that eventually turned into a formal piece of choreography. 

At the time I was just starting to think about creating a math/dance program for preschoolers and my biggest question was how could I encourage that kind of exploration?  It seemed unlikely I would be able to find an empty factory or other interesting environment and get a bunch of preschoolers there on a weekly basis.  And then it hit me -- I could create an environment out of tape.  I could define three-dimensional space using two-dimensional lines and colors.

By way of explanation, when I say 'floor tape' I am referring to two different products, both of them sticky.  First, there's painters' tape which is blue and low tack so it can come up easily off both hard surfaces and carpet (except when kids poke their pencils into it and it gets perforated, but that's a different story.)  There is also the floor tape that P.E. teachers use, which comes in lots of fabulous colors, the better to design with, my dear. 

So, why am I so passionate about floor tape?  Let's see...
  1. Straight Lines, Part 1: A simple straight line taped down a hallway becomes a pathway.  It also divides the space in two, and provides a chance to walk on it or jump over it.  Best of all, one can march (or walk, or skip, or slide, etc) rhythmically down it singing "As I was marching down the street, down the street, down the street..." 
  2. Straight Lines, Part 2: When my daughter was three her teachers put down a straight line of tape to help the class 'line up' before leaving the classroom.  A simple, visual learning strategy.  Later in the year I saw pictures of what else the kids had done with the line.  They had used their large blocks to build a wall the length of the tape and then lined up their animals and cars alongside it.  A wonderful example of how a simple alteration of a child's environment can deepen their experience and exploration of the space around them. 
  3. Floor tape can define and redefine the space it's in.  Large open spaces encourage a lot of endless running.  The minute you create a large rectangular box on the floor, with corners, you can now have enough of a visual to focus a preschooler's attention to IN (the box), OUT (of the box), AROUND (the sides of the box), CORNERS, and ACROSS, all age-appropriate math terminology.
  4. A simple taped perimeter can highlight empty space, as in "Find an empty spot inside the tape and make a shape."
  5. Tape two or more parallel lines down a space and see what happens when you sing "Down by the banks of the hankey pankey, when the bullfrogs jump from bank to bankey..."
Ultimately, I would love if every preschool teacher would just put down taped lines in their classrooms and then stand back to observe how the children interact with them.  Start with one straight line and go from there.  Let me know if you want to talk further about this idea --  I'd jump at the chance to see how far we could take this.

LinkWithin

Related Posts Plugin for WordPress, Blogger...